性能爆表!INFINI Gateway 性能与压力测试结果
本文主要是分享下对 INFINI Gateway 的压测过程,使用graphite观测压力测试qps的过程。如有什么错漏的地方,还请多多包涵,不多逼逼,进入正题
硬件配置
| 主机 | 型号 | CPU | 内存/带宽 | 系统 |
|---|---|---|---|---|
| 172.31.18.148(gateway1) | aws c5a.8xlarge | x86 32核 | 64G/10G | Ubuntu 20.04.1 LTS |
| 172.31.24.102(gateway2) | aws c6g.8xlarge | arm 32核 | 64G/10G | Ubuntu 20.04.1 LTS |
| 172.31.23.133(test) | aws c5a.8xlarge | x86 32核 | 64G/10G | Ubuntu 20.04.1 LTS |
测试准备
系统调优(所有节点)
修改系统参数
vi /etc/sysctl.conf
net.netfilter.nf_conntrack_max = 262144
net.nf_conntrack_max = 262144
net.ipv4.ip_forward = 1
net.ipv4.conf.default.accept_redirects = 0
net.ipv4.conf.default.rp_filter = 1
net.ipv4.conf.all.accept_redirects = 0
net.ipv4.conf.all.send_redirects = 0
net.ipv4.ip_nonlocal_bind=1
fs.file-max=10485760
net.core.rmem_max=4194304
net.core.wmem_max=4194304
net.ipv4.tcp_tw_reuse=1
net.ipv4.tcp_timestamps=1
net.core.somaxconn=32768
net.ipv4.tcp_syncookies=1
net.ipv4.tcp_max_syn_backlog=65535
net.ipv4.tcp_synack_retries=0
net.core.netdev_max_backlog=65535
net.core.rmem_max=4194304
net.core.wmem_max=4194304
#修改默认的本地端口范围
net.ipv4.ip_local_port_range='1024 65535'
net.ipv4.tcp_tw_reuse=1
net.ipv4.tcp_timestamps=1
保存并执行 sysctl -p
修改用户单进程的最大文件数,
用户登录时生效
echo '* soft nofile 1048576' >> /etc/security/limits.conf
echo '* hard nofile 1048576' >> /etc/security/limits.conf
用户单进程的最大文件数 当前会话生效
ulimit -n 1048576
安装docker,graphite(gateway 安装)
sudo apt-get update
sudo apt-get install docker.io
docker run -d --name graphite --restart=always -p 80:80 -p 2003-2004:2003-2004 -p 2023-2024:2023-2024 -p 8125:8125/udp -p 8126:8126 graphiteapp/graphite-statsd
下载安装gateway
下载最新版infini-gateway(https://github.com/medcl/infini-gateway/releases),下载后无需安装即可使用
修改配置文件
解压后将gateway.yml配置文件修改成如下:
path.data: data
path.logs: log
entry:
  - name: es_gateway #your gateway endpoint
    enabled: true
   router: not_found #configure your gateway's routing flow
    network:
      binding: 0.0.0.0:8000
#      skip_occupied_port: false
      reuse_port: true #you can start multi gateway instance, they share same port, to full utilize system's resources
    tls:
      enabled: false #if your es is using https, the gateway entrypoint should enable https too
flow:
  - name: not_found #testing flow
    filter:
      - name: not_found
        type: echo
        parameters:
          str: '{"message":"not found"}'
          repeat: 1
  - name: cache_first
    filter: #comment out any filter sections, like you don't need cache or rate-limiter
      - name: get_cache_1
        type: get_cache
        parameters:
          pass_patterns: ["_cat","scroll", "scroll_id","_refresh","_cluster","_ccr","_count","_flush","_ilm","_ingest","_license","_migration","_ml","_rollup","_data_stream","_open", "_close"]
#          hash_factor:
#            header:
#              - "*"
#            path: true
#            query_args:
#              - id
#          must_cache:
#            method:
#              - GET
#            path:
#              - _search
#              - _async_search
      - name: rate_limit_1
        type: rate_limit
        parameters:
          message: "Hey, You just reached our request limit!"
          rules: #configure match rules against request's PATH, eg: /_cluster/health, match the first rule and return
            - pattern: "/(?P<index_name>medcl)/_search" #use index name, will match: /medcl/_search, with limit medcl with max_qps ~=3
              max_qps: 3 #setting max qps after match
              group: index_name #use regex group name to extract the throttle bucket name
            - pattern: "/(?P<index_name>.*?)/_search" #use regex pattern to match index, will match any /$index/_search, and limit each index with max_qps ~=100
              max_qps: 100
              group: index_name
      - name: elasticsearch_1
        type: elasticsearch
        parameters:
          elasticsearch: default  #elasticsearch configure reference name
          max_connection: 1000 #max tcp connection to upstream, default for all nodes
          max_response_size: -1 #default for all nodes
          balancer: weight
          discovery:
            enabled: true
      - name: set_cache_1
        type: set_cache
  - name: request_logging
    filter:
      - name: request_header_filter
        type: request_header_filter
        parameters:
          include:
            CACHE: true
      - name: request_logging_1
        type: request_logging
        parameters:
          queue_name: request_logging
router:
  - name: default
    tracing_flow: request_logging #a flow will execute after request finish
    default_flow: cache_first
    rules: #rules can't be conflicted with each other, will be improved in the future
      - id: 1 # this rule means match every requests, and sent to `cache_first` flow
        method:
          - "*"
        pattern:
          - /
        flow:
          - cache_first # after match, which processing flow will go through
  - name: not_found
    default_flow: not_found
elasticsearch:
- name: default
 enabled: false
  endpoint: http://localhost:9200 # if your elasticsearch is using https, your gateway should be listen on as https as well
  version: 7.6.0 #optional, used to select es adaptor, can be done automatically after connect to es
  index_prefix: gateway_
  basic_auth: #used to discovery full cluster nodes, or check elasticsearch's health and versions
    username: elastic
    password: Bdujy6GHehLFaapFI9uf
statsd:
  enabled: true
  host: 127.0.0.1
  port: 8125
  namespace: gateway.
modules:
- name: elastic
 enabled: false
  elasticsearch: default
  init_template: true
- name: pipeline
  enabled: true
  runners:
    - name: primary
      enabled: true
      max_go_routine: 1
      threshold_in_ms: 0
      timeout_in_ms: 5000
      pipeline_id: request_logging_index
pipelines:
- name: request_logging_index
  start:
    joint: json_indexing
   enabled: false
    parameters:
      index_name: "gateway_requests"
      elasticsearch: "default"
      input_queue: "request_logging"
      num_of_messages: 1
      timeout: "60s"
      worker_size: 6
      bulk_size: 5000
  process: []
queue:
  min_msg_size: 1
  max_msg_size: 500000000
  max_bytes_per_file: 50*1024*1024*1024
  sync_every_in_seconds: 30
  sync_timeout_in_seconds: 10
  read_chan_buffer: 0
开始测试
本文中使用的压测工具http-loader,见附件
为了能充分利用服务器多核资源,测试的时候直接启用多个进程
压测x86 gateway服务器
在gateway1上启动五个gateway
./gateway-amd64&
./gateway-amd64&
./gateway-amd64&
./gateway-amd64&
./gateway-amd64&
测试gateway返回内容
curl http://172.31.18.148:8000
输出
{"message":"not found"}
在gateway2,test机上同时执行(1000个并发压测10分钟)
./http-loader -c 1000 -d 600 http://172.31.18.148:8000观测gateway1服务器指标
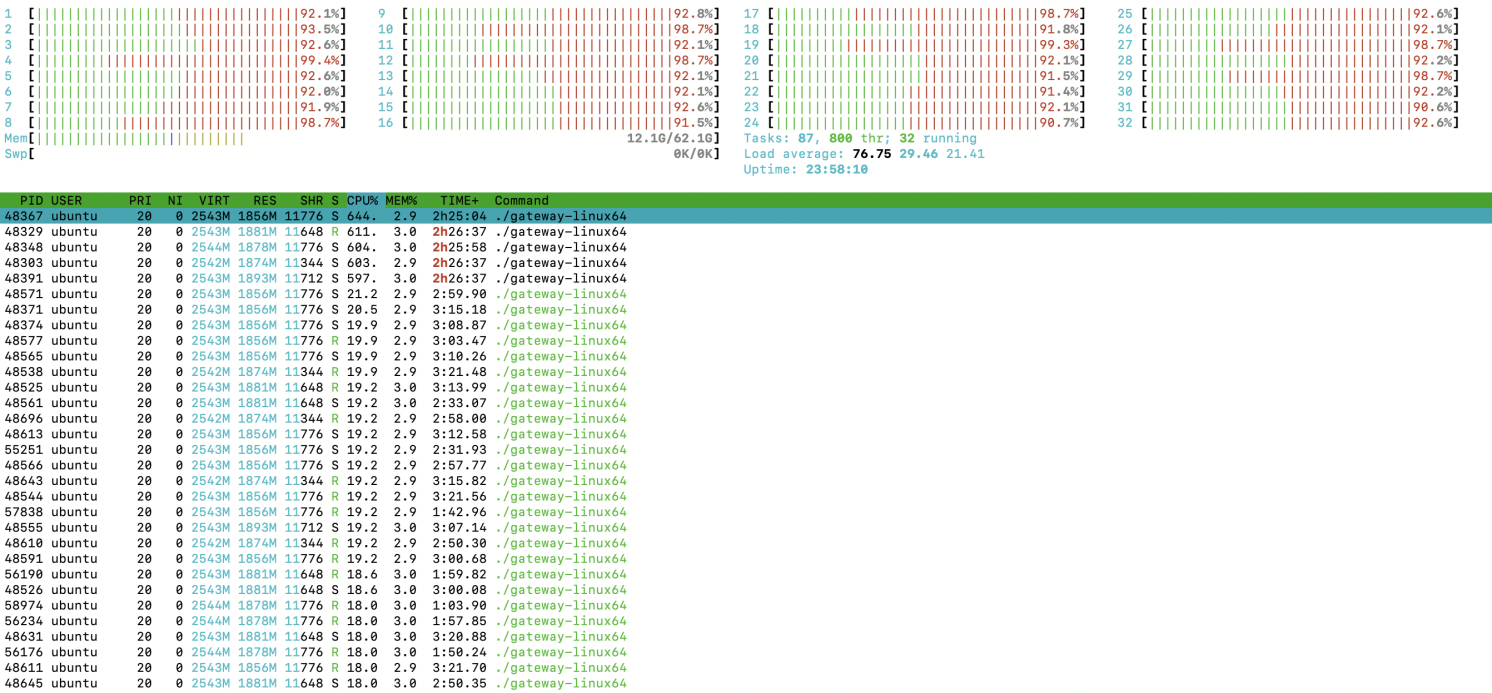
使用 htop 查看系统负载情况,如下图:
这里我们看到cpu基本跑满,说明gateway已经压到极限了
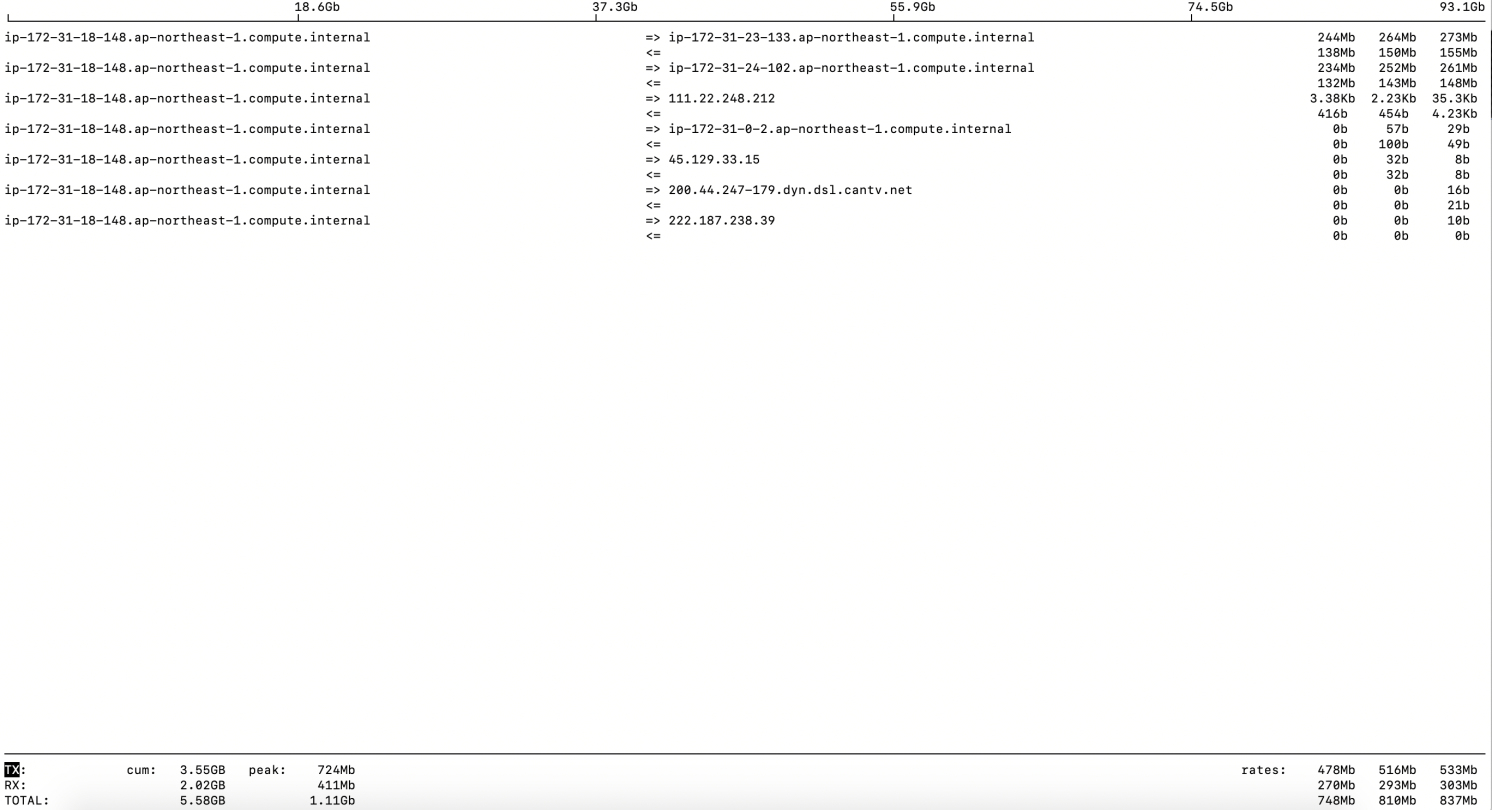
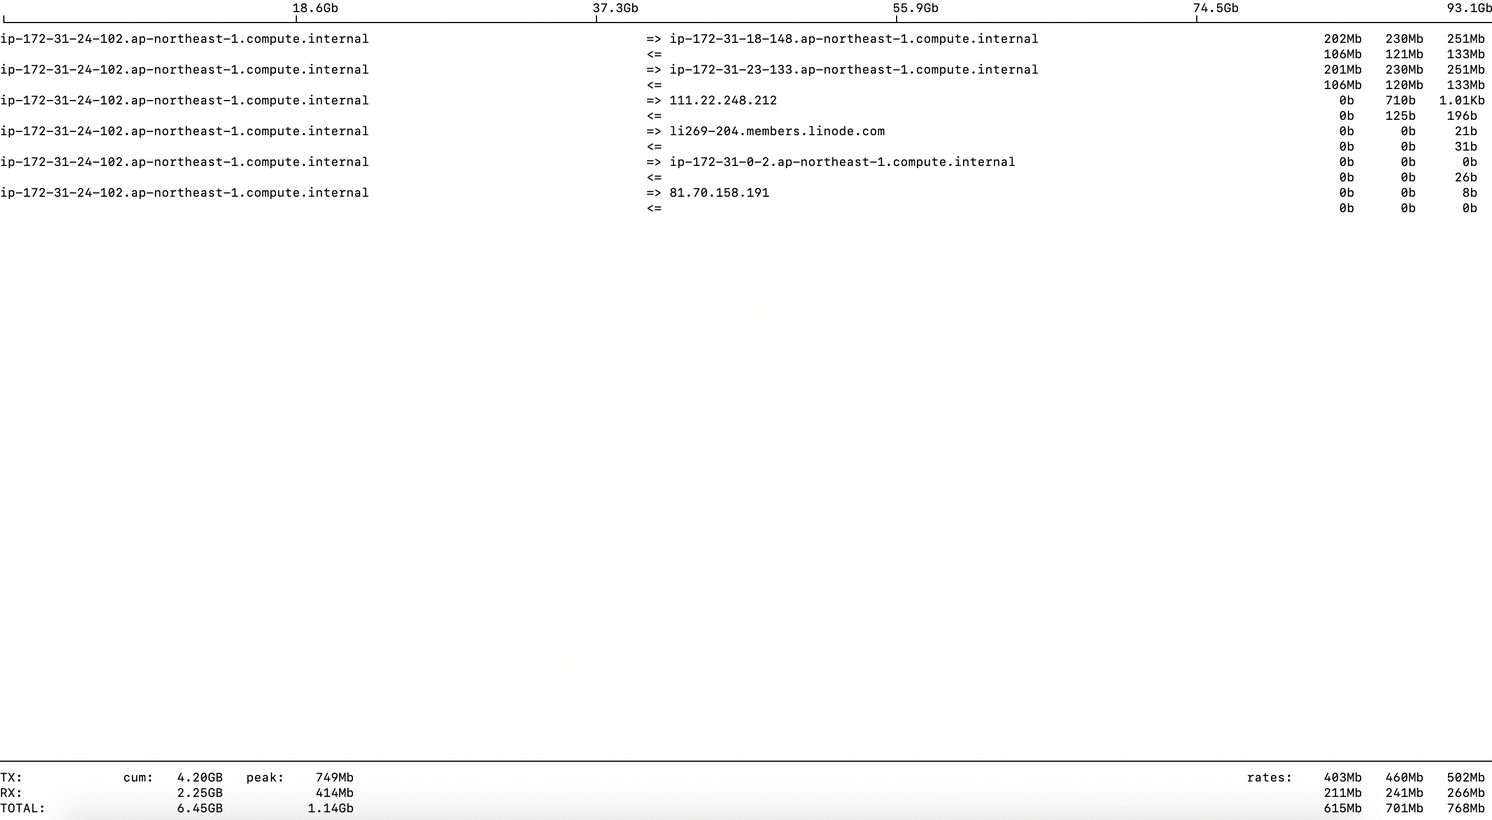
使用iftop查看系统网络流量情况,如下图:
使用netstat,ss查看tcp连接数,如下图:
sudo netstat -n | awk '/^tcp/ {++S[$NF]} END {for(a in S) print a, S[a]}'
ss -s
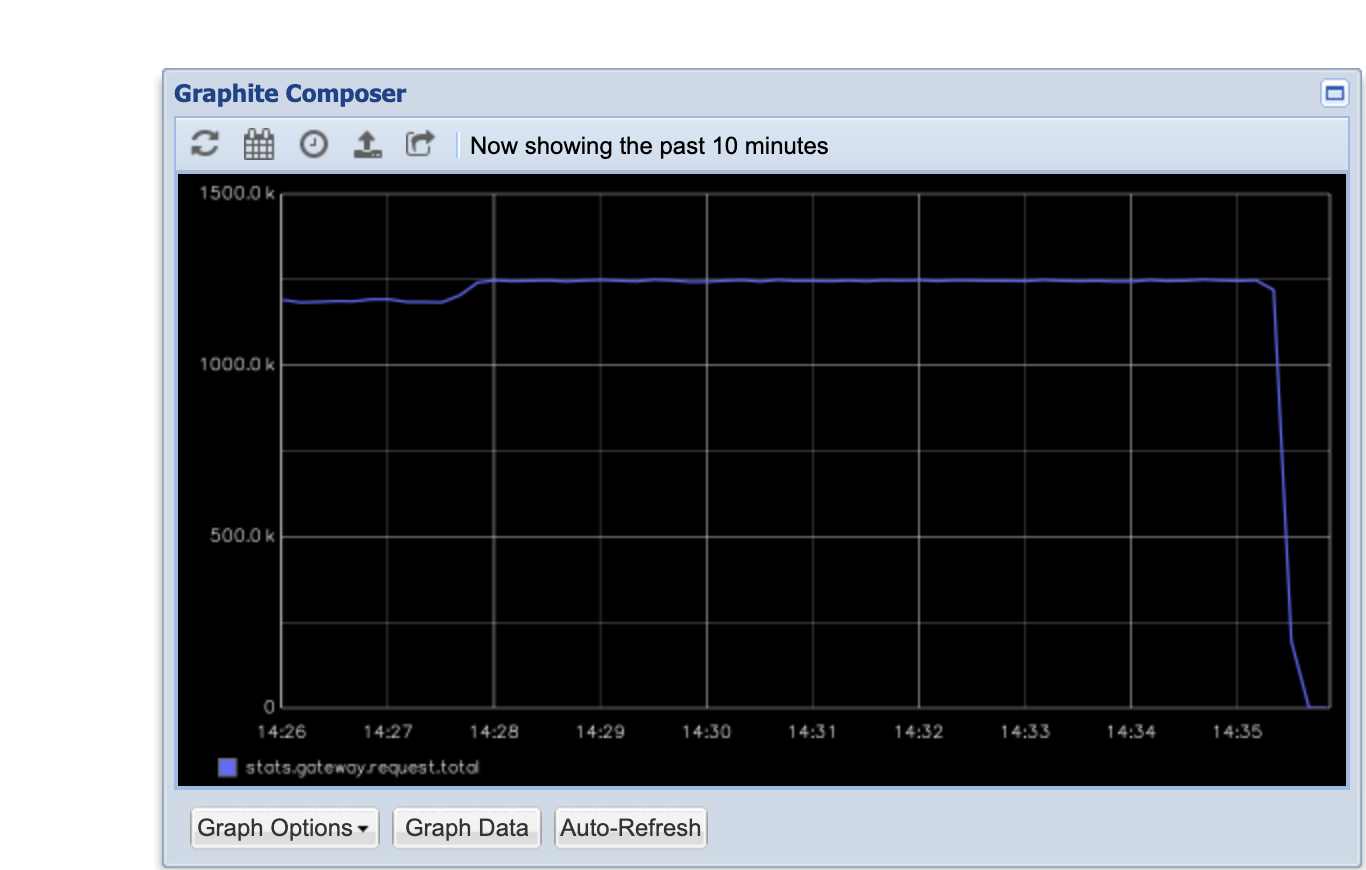
查看graphite statsd qps指标,如下图:
压测arm gateway服务器
在gateway2上启动五个gateway
./gateway-arm64&
./gateway-arm64&
./gateway-arm64&
./gateway-arm64&
./gateway-arm64&
测试gateway返回内容
curl http://172.31.18.148:8000
输出
{"message":"not found"}在gateway1,test机上同时执行(1000个并发压测10分钟)
./http-loader -c 1000 -d 600 http://172.31.18.148:8000观测gateway2服务器指标
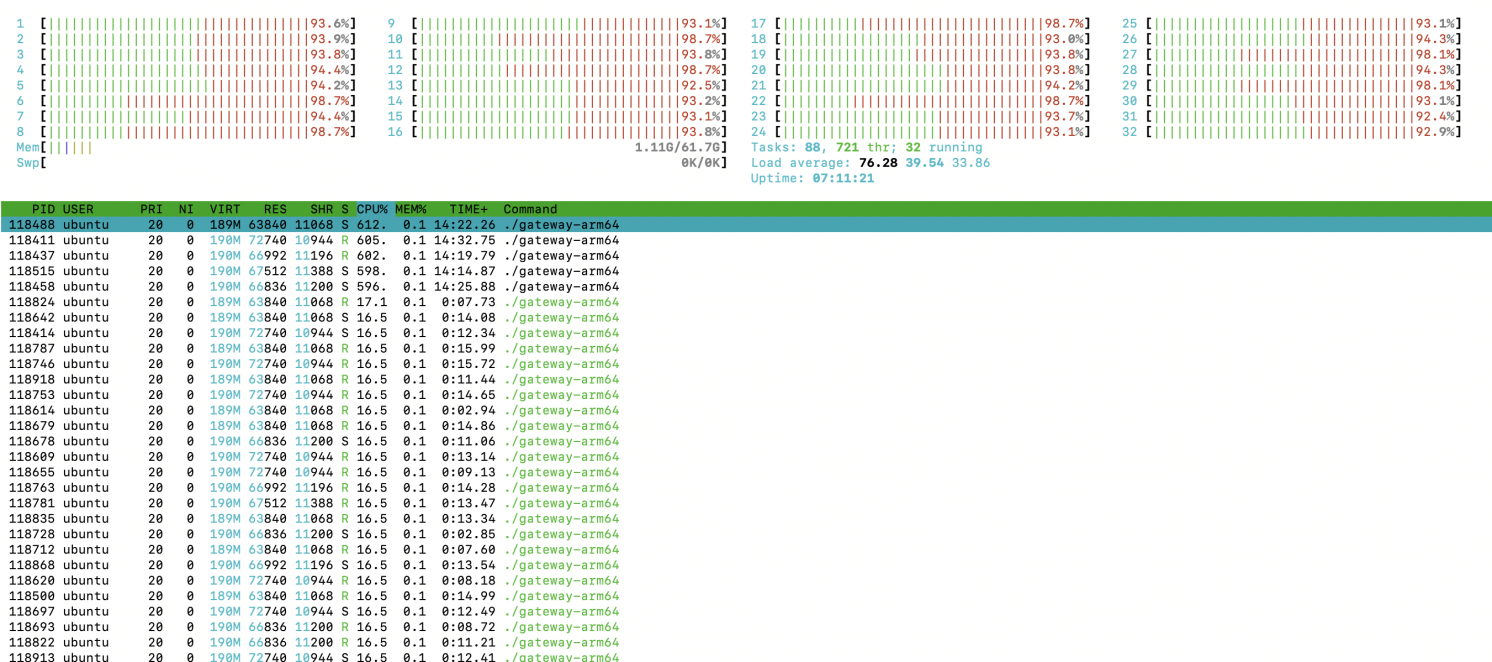
使用htop查看系统负载情况,如下图:
使用iftop查看系统网络流量情况,如下图:
使用netstat,ss查看tcp连接数,如下图:
sudo netstat -n | awk '/^tcp/ {++S[$NF]} END {for(a in S) print a, S[a]}'
ss -s
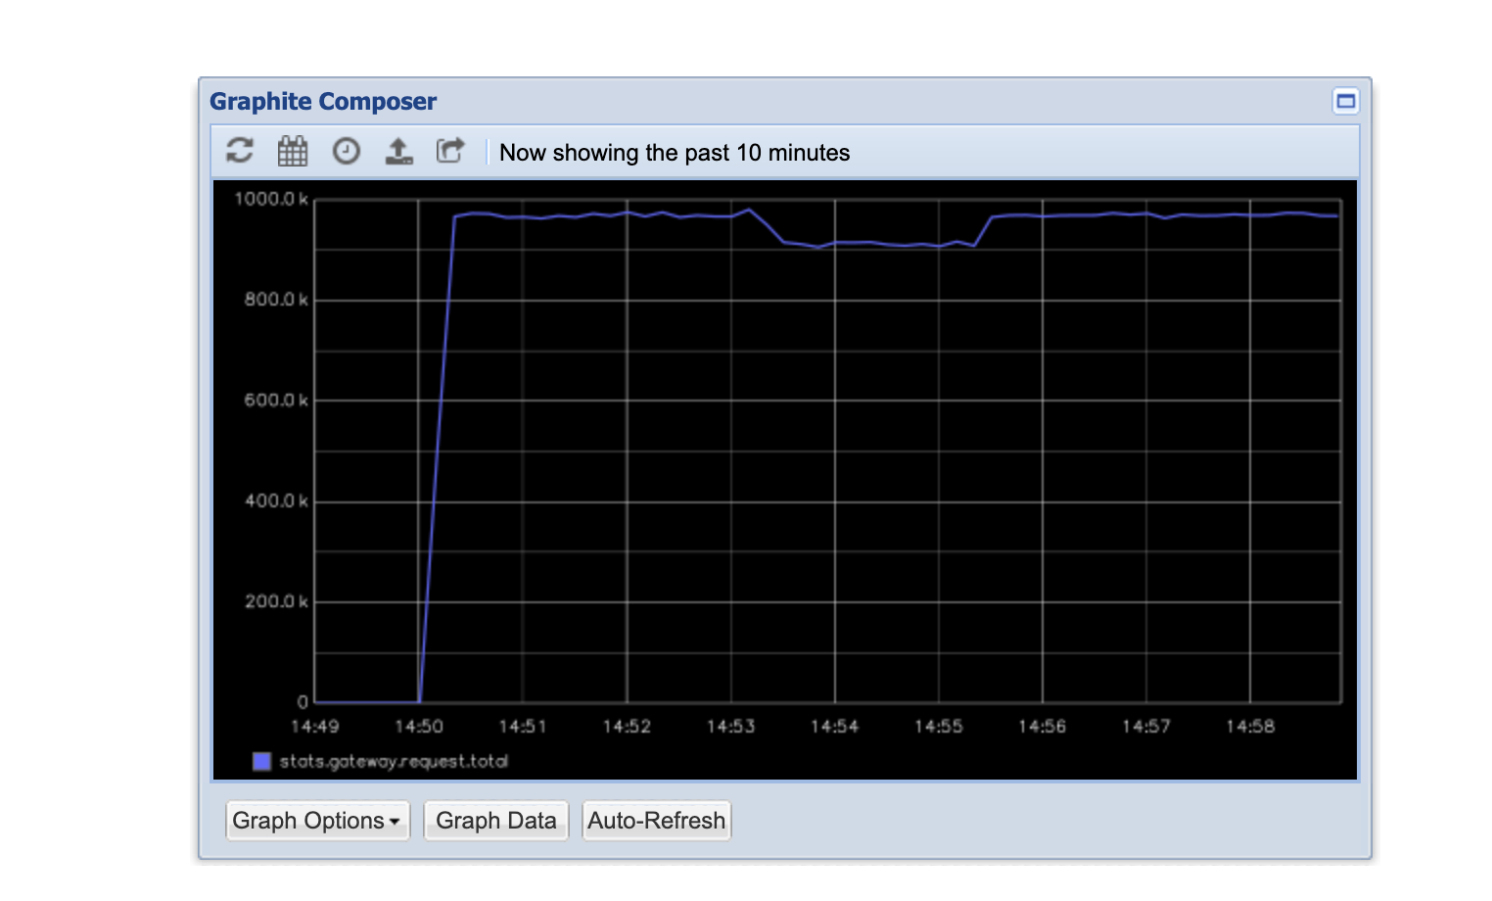
查看graphite statsd qps指标,如下图:
这里我们可以看到qps基本稳定在125万的qps
压测总结
单机压测x86架构机器上能达到95多万的qps, arm架构机器上能达到125万的qps,可见性能还是非常优秀的。由于文章篇幅原因,gateway单进程的压测就不贴了,有兴趣的同学可以自己下载测试下。
收起阅读 »极限网关 INFINI Gateway 初体验
下载
下载地址:https://github.com/medcl/infini-gateway/releases
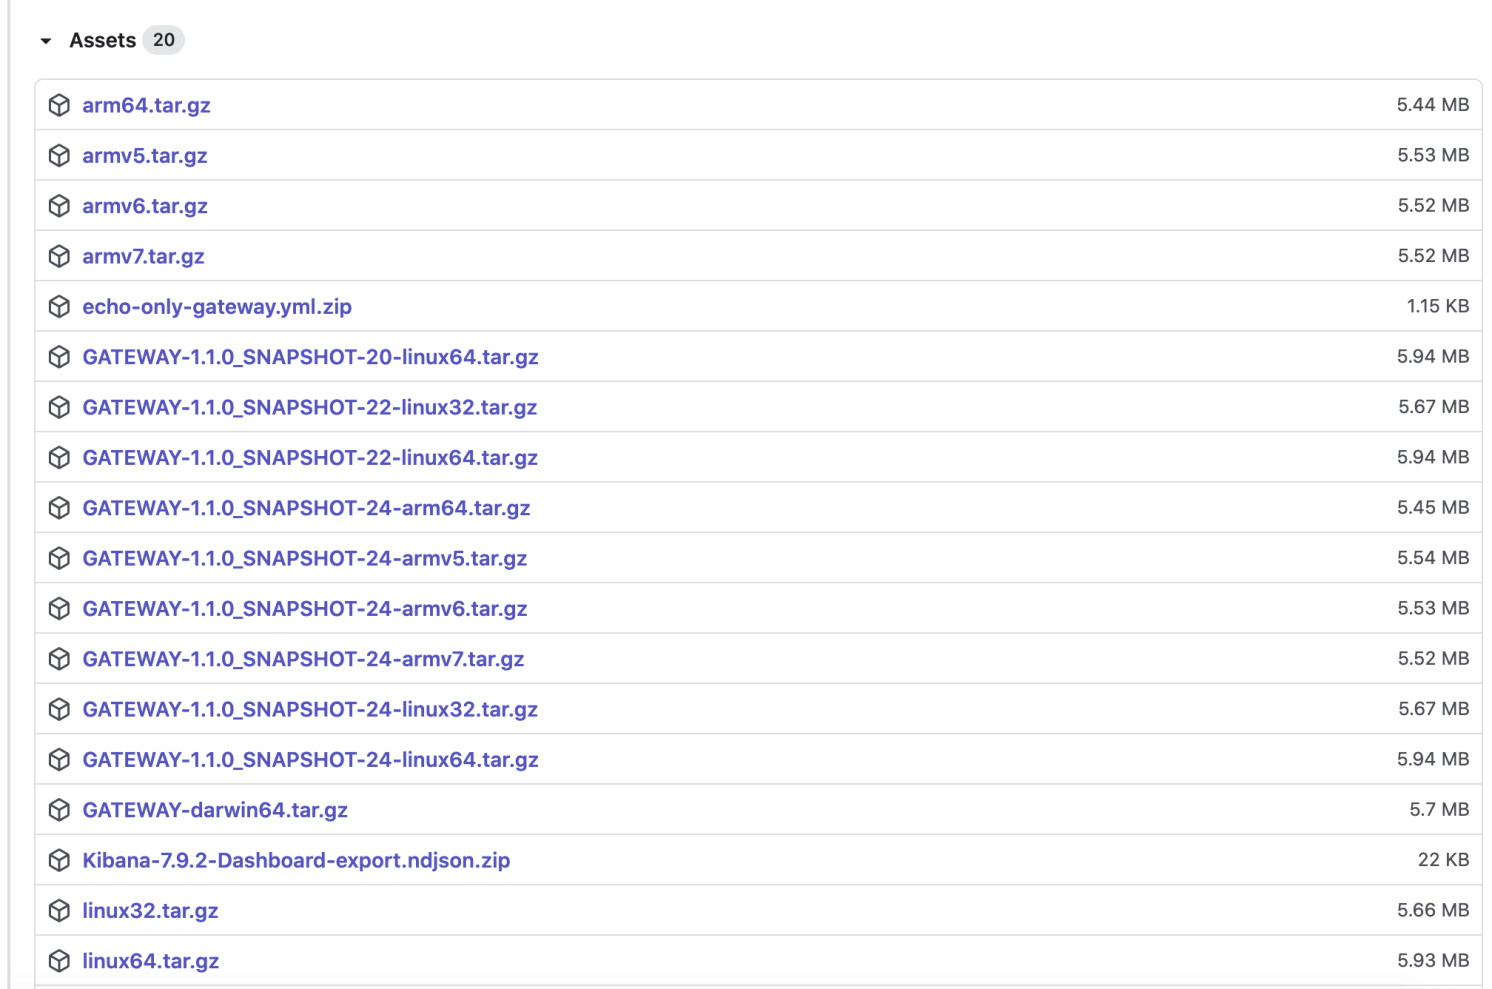
找到当前最新版1.1.0_SNAPSHOT
根据自己的操作系统环境选择相应的包下载,本人用的是Macbook,选择了GATEWAY-darwin64.tar.gz
#切换该路径下(路径自定)

cd /Users/shiyang/code/elastic/gateway

#下载

wget https://github.com/medcl/infin ... ar.gz

#下载完后解压

tar -zxvf GATEWAY-darwin64.tar.gz

#解压后能看到两个新文件,一个可执行二进制文件,一个yml配置文件

ls

#gateway-darwin64   gateway.yml
安装部署
在run之前需要先运行elastisearch,否则会报错,如图所示:
接下来先启动es集群(如果你本地还没有部署es,建议先参考官网的es安装教程下载部署)
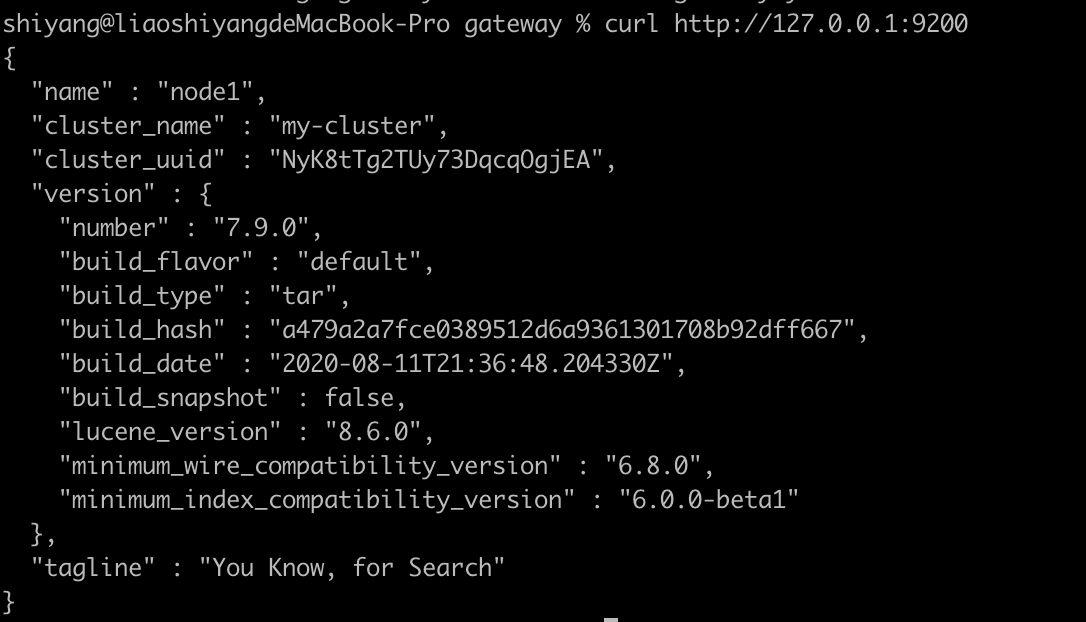
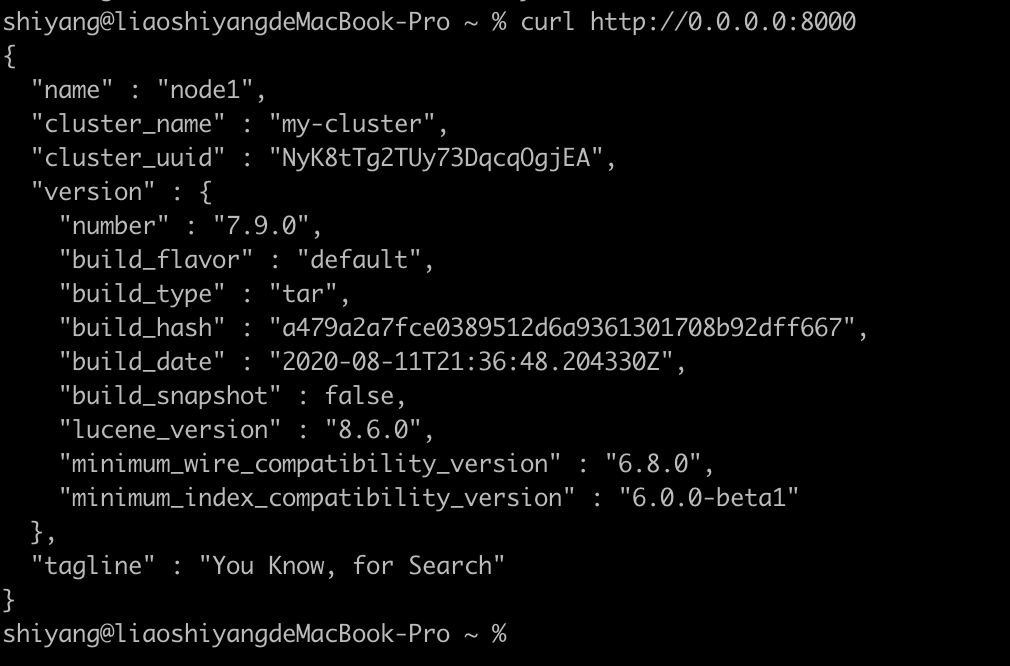
本机用的es版本为7.9.0,如下图表示启动es成功:
接下来再启动gateway,yml配置文件可以先默认,后续可根据需要再修改。
#启动

./gateway-darwin64
启动成功如下图所示:
成功启动后,我们就可以直接访问gateway了。
curl http://0.0.0.0:8000到此,gateway就算本地部署完毕了。
是不是很简单?嗯,下载即使用,简单方便。
(接下来可以试用一下gateway的特性了。将发布在下一篇文章。)
下载
下载地址:https://github.com/medcl/infini-gateway/releases
找到当前最新版1.1.0_SNAPSHOT
根据自己的操作系统环境选择相应的包下载,本人用的是Macbook,选择了GATEWAY-darwin64.tar.gz
#切换该路径下(路径自定)

cd /Users/shiyang/code/elastic/gateway

#下载

wget https://github.com/medcl/infin ... ar.gz

#下载完后解压

tar -zxvf GATEWAY-darwin64.tar.gz

#解压后能看到两个新文件,一个可执行二进制文件,一个yml配置文件

ls

#gateway-darwin64   gateway.yml
安装部署
在run之前需要先运行elastisearch,否则会报错,如图所示:
接下来先启动es集群(如果你本地还没有部署es,建议先参考官网的es安装教程下载部署)
本机用的es版本为7.9.0,如下图表示启动es成功:
接下来再启动gateway,yml配置文件可以先默认,后续可根据需要再修改。
#启动

./gateway-darwin64
启动成功如下图所示:
成功启动后,我们就可以直接访问gateway了。
curl http://0.0.0.0:8000到此,gateway就算本地部署完毕了。
是不是很简单?嗯,下载即使用,简单方便。
(接下来可以试用一下gateway的特性了。将发布在下一篇文章。) 收起阅读 »
社区日报 第1132期 (2020-12-08)
https://www.jianshu.com/p/429e563bb33e
2、ES中9款JavaScript Query构造库推荐。
https://openbase.io/categories ... aries
3、File Beat+ELK日志入门教程。
https://www.javainuse.com/elas ... t-elk
编辑:叮咚光军
归档:https://ela.st/cn-daily-all
订阅:https://ela.st/cn-daily-sub
沙龙:https://ela.st/cn-meetup
https://www.jianshu.com/p/429e563bb33e
2、ES中9款JavaScript Query构造库推荐。
https://openbase.io/categories ... aries
3、File Beat+ELK日志入门教程。
https://www.javainuse.com/elas ... t-elk
编辑:叮咚光军
归档:https://ela.st/cn-daily-all
订阅:https://ela.st/cn-daily-sub
沙龙:https://ela.st/cn-meetup 收起阅读 »
从零基础到能够完成微服务可观测性的专家 - Service Map 实践
为 Logstash 日志启动索引生命周期管理
社区日报 第1131期 (2020-12-07)
https://byronhe.com/post/elasticsearch-dev-arch/
2.集群稳定性的相关讨论
https://elasticsearch.cn/question/84
3.es对比TiDB
http://www.machengyu.net/elast ... .html
编辑:cyberdak
归档:https://ela.st/cn-daily-all
订阅:https://ela.st/cn-daily-sub
沙龙:https://ela.st/cn-meetup
https://byronhe.com/post/elasticsearch-dev-arch/
2.集群稳定性的相关讨论
https://elasticsearch.cn/question/84
3.es对比TiDB
http://www.machengyu.net/elast ... .html
编辑:cyberdak
归档:https://ela.st/cn-daily-all
订阅:https://ela.st/cn-daily-sub
沙龙:https://ela.st/cn-meetup 收起阅读 »
社区日报 第1130期 (2020-12-06)
https://github.com/kentsyx/stock-insight-engine
2.全文搜索性能:Postgres与Elasticsearch。
https://rocky.dev/full-text-search
3.比特币(仍然)没有意义。
https://thinkoutloudnews.subst ... sense
编辑:至尊宝
归档:https://ela.st/cn-daily-all
订阅:https://ela.st/cn-daily-sub
沙龙:https://ela.st/cn-meetup
https://github.com/kentsyx/stock-insight-engine
2.全文搜索性能:Postgres与Elasticsearch。
https://rocky.dev/full-text-search
3.比特币(仍然)没有意义。
https://thinkoutloudnews.subst ... sense
编辑:至尊宝
归档:https://ela.st/cn-daily-all
订阅:https://ela.st/cn-daily-sub
沙龙:https://ela.st/cn-meetup
收起阅读 »
社区日报 第1129期 (2020-12-05)
1.es防止字段数量爆炸的一些策略
https://medium.com/handy-tech/elasticsearch-field-explosion-ca0a21f97a4a
2.es查找缺失多个字段的文档
https://stackoverflow.com/questions/65125012/elasticsearch-find-documents-missing-two-fields
3.es查询相关性优化(需翻墙)
1.es防止字段数量爆炸的一些策略
https://medium.com/handy-tech/elasticsearch-field-explosion-ca0a21f97a4a
2.es查找缺失多个字段的文档
https://stackoverflow.com/questions/65125012/elasticsearch-find-documents-missing-two-fields
3.es查询相关性优化(需翻墙)
https://www.youtube.com/watch?v=1iwQFuLVoMk
收起阅读 »社区日报 第1128期 (2020-12-04)
https://elasticsearch.cn/article/14165
2、使用Flink实现索引数据到Elasticsearch
https://mp.weixin.qq.com/s/fIvDfa7uekO4WHaxFICnmg
3、剖析Elasticsearch的IndexSorting:一种查询性能优化利器
https://mp.weixin.qq.com/s/dpGzHwXQ4PERADViLrjuqw
编辑:铭毅天下
归档:https://ela.st/cn-daily-all
订阅:https://ela.st/cn-daily-sub
沙龙:https://ela.st/cn-meetup
https://elasticsearch.cn/article/14165
2、使用Flink实现索引数据到Elasticsearch
https://mp.weixin.qq.com/s/fIvDfa7uekO4WHaxFICnmg
3、剖析Elasticsearch的IndexSorting:一种查询性能优化利器
https://mp.weixin.qq.com/s/dpGzHwXQ4PERADViLrjuqw
编辑:铭毅天下
归档:https://ela.st/cn-daily-all
订阅:https://ela.st/cn-daily-sub
沙龙:https://ela.st/cn-meetup 收起阅读 »
Elasticsearch 极限网关测试版本发布
每日构建:http://release.elasticsearch.cn/
镜像地址:https://hub.docker.com/r/infinilabs/gateway
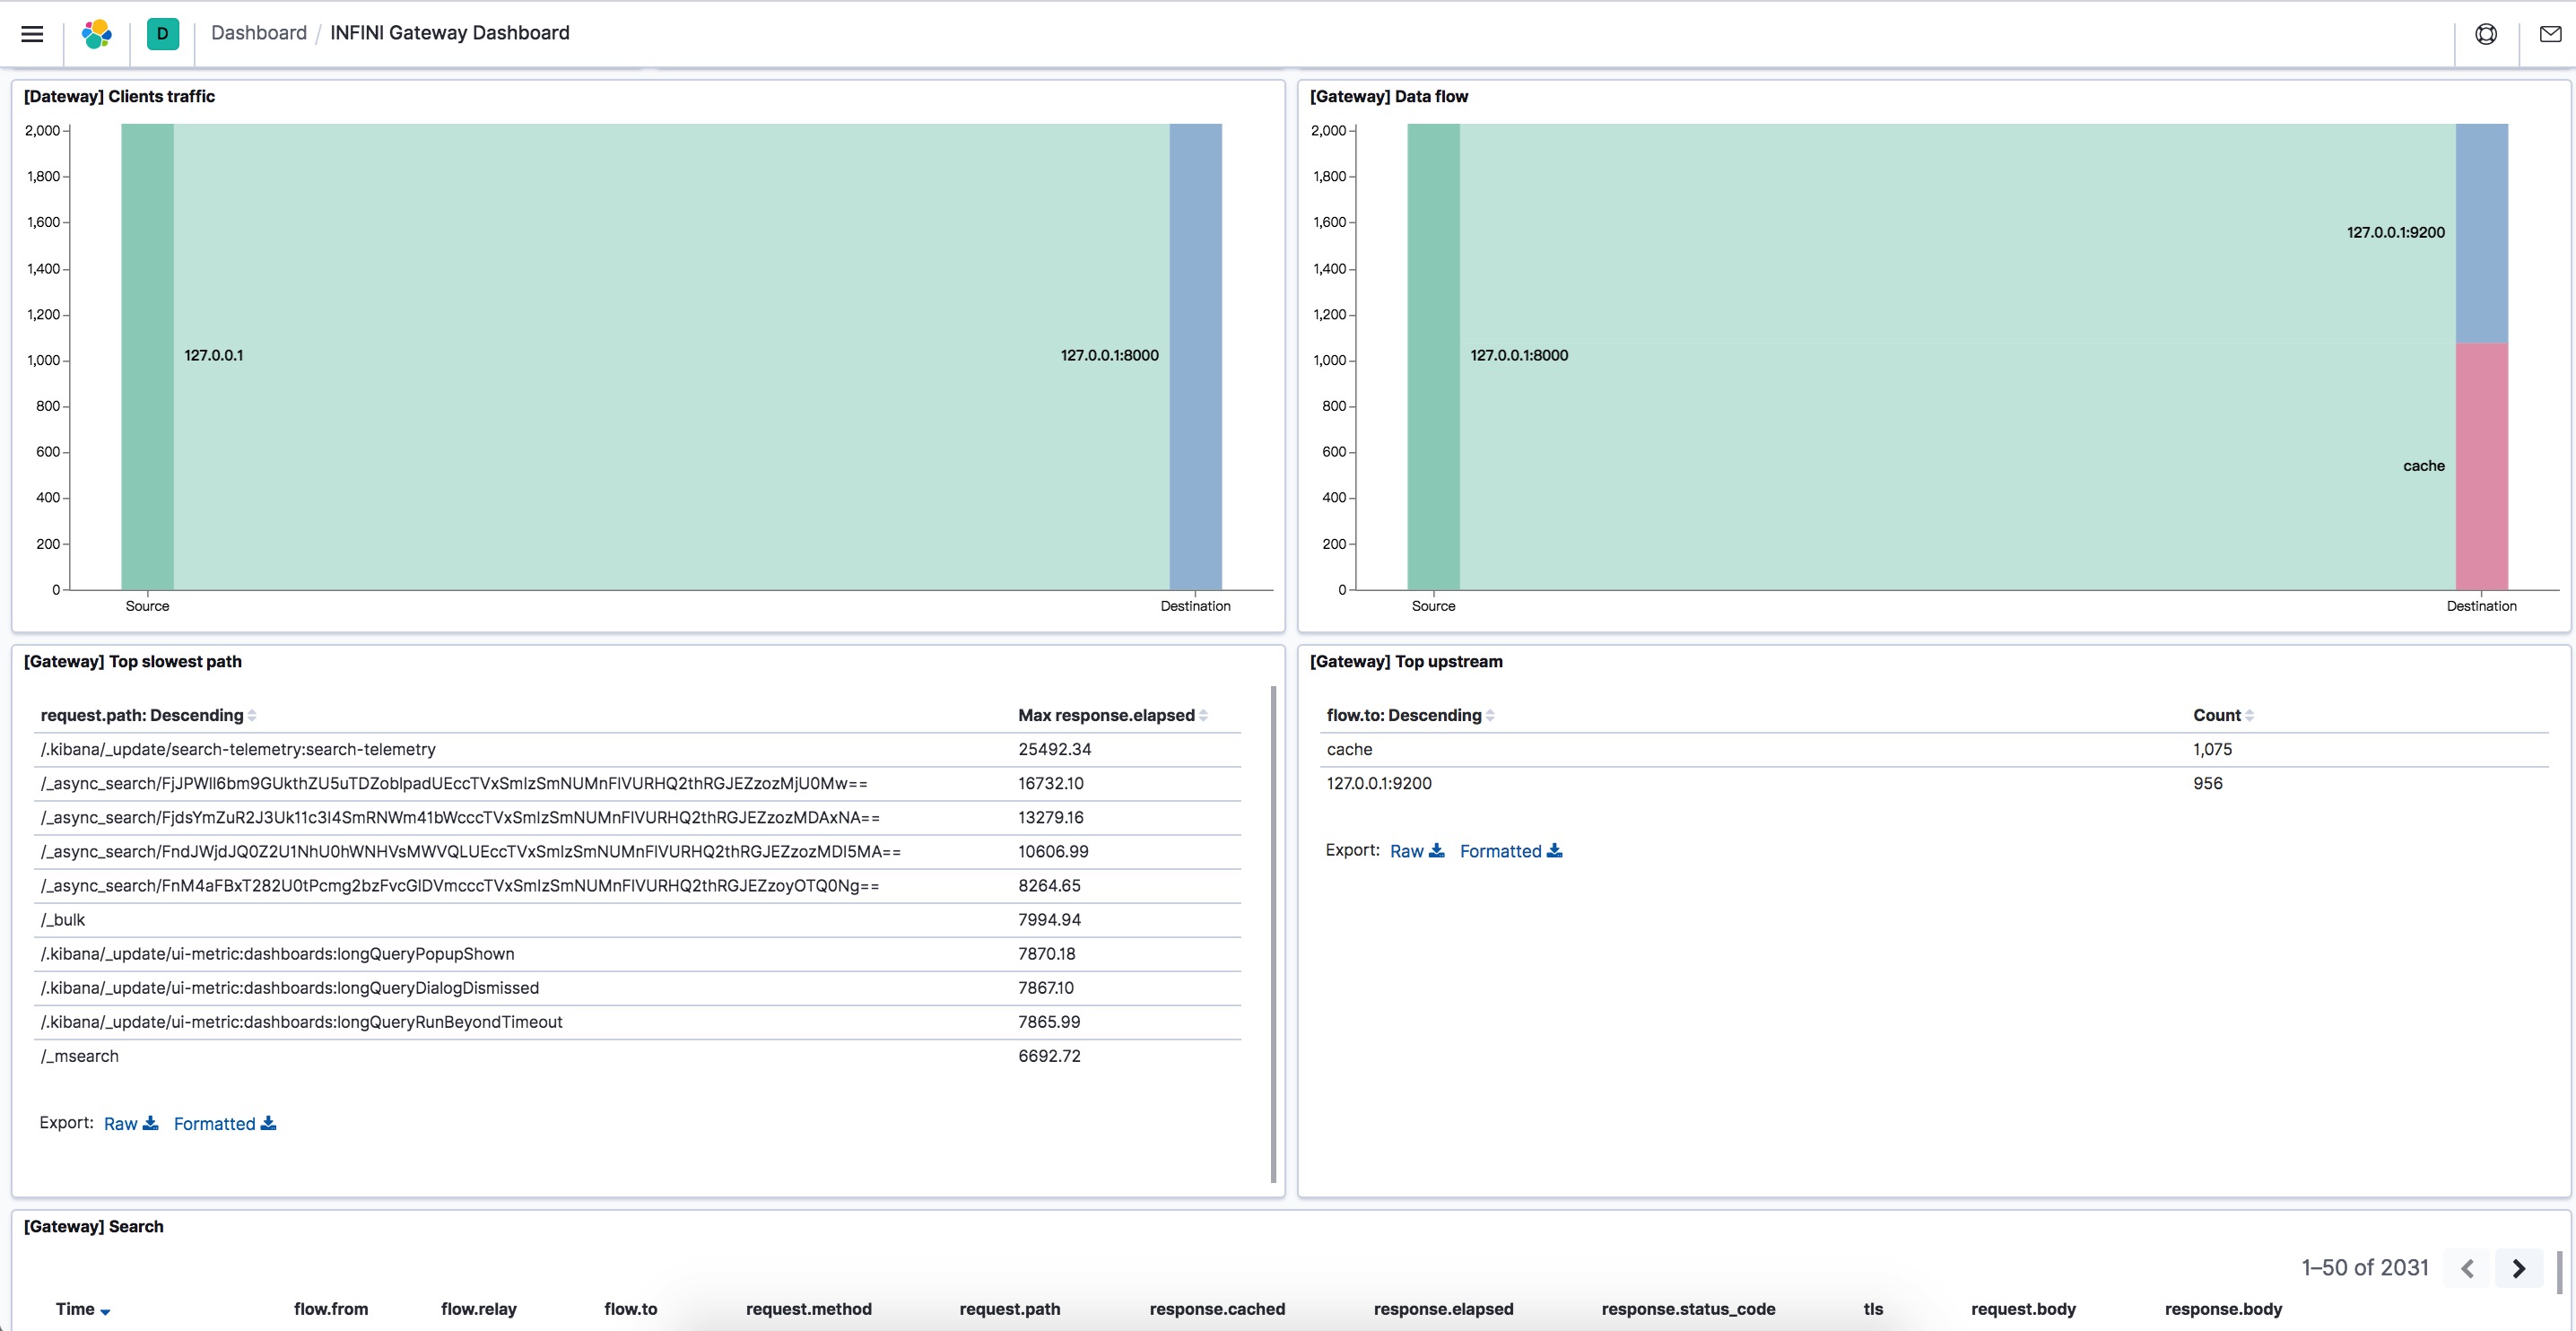
文档手册:https://极限网关.com
目前提供的功能:
- 索引级别的请求限速
- 重复请求可以缓存
- Kibana 无缝提速
- Elasticsearch 节点自动发现
- 基于权重的节点选择,权重可配置
- 可控制到每个后端节点的最大连接数
- 查询日志统计分析,用于追踪请求排错审计
性能优异,经过测试,比 Nginx 都更胜一筹。
[root@XXX-ES-01 linux64]# ./esm -s https://elastic:pass@xx.xx.cn:9343 -d https://elastic:pass@xx.xx.cn:8000 -x medcl2 -y medcl23 -r -w 200 --sliced_scroll_size=40 -b 10 -t=30m

[11-12 22:09:38] [INF] [main.go:461,main] start data migration..

Scroll 20377840 / 20387840   99.95% 1m20s

Bulk 20371785 / 20387840   99.92% 1m53s

[11-12 22:11:32] [INF] [main.go:492,main] data migration finished.
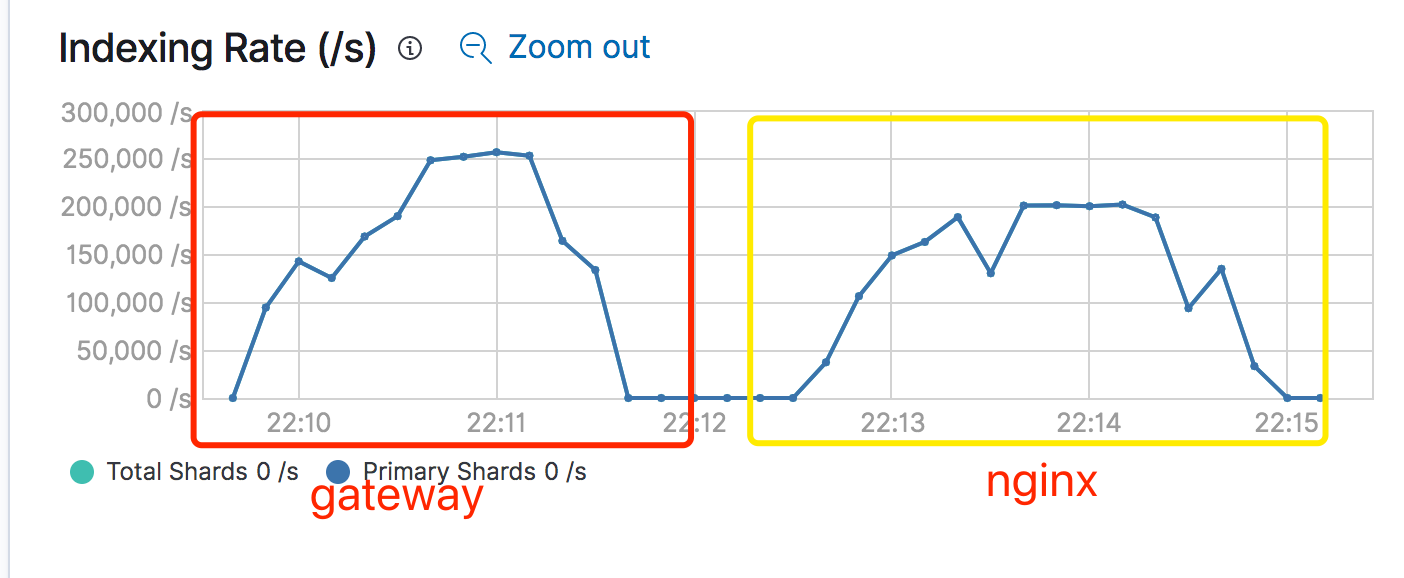
使用 ESM 进行集群的一个 2千多万的索引数据进行导入导出,分别走 Nginx 和 Elasticsearch 网关,网关和 Nginx 都部署在同一台16 核 32GB 的机器上,16 核全部跑满,Nginx 可以达到 20w/s,网关可以达到 25w/s。
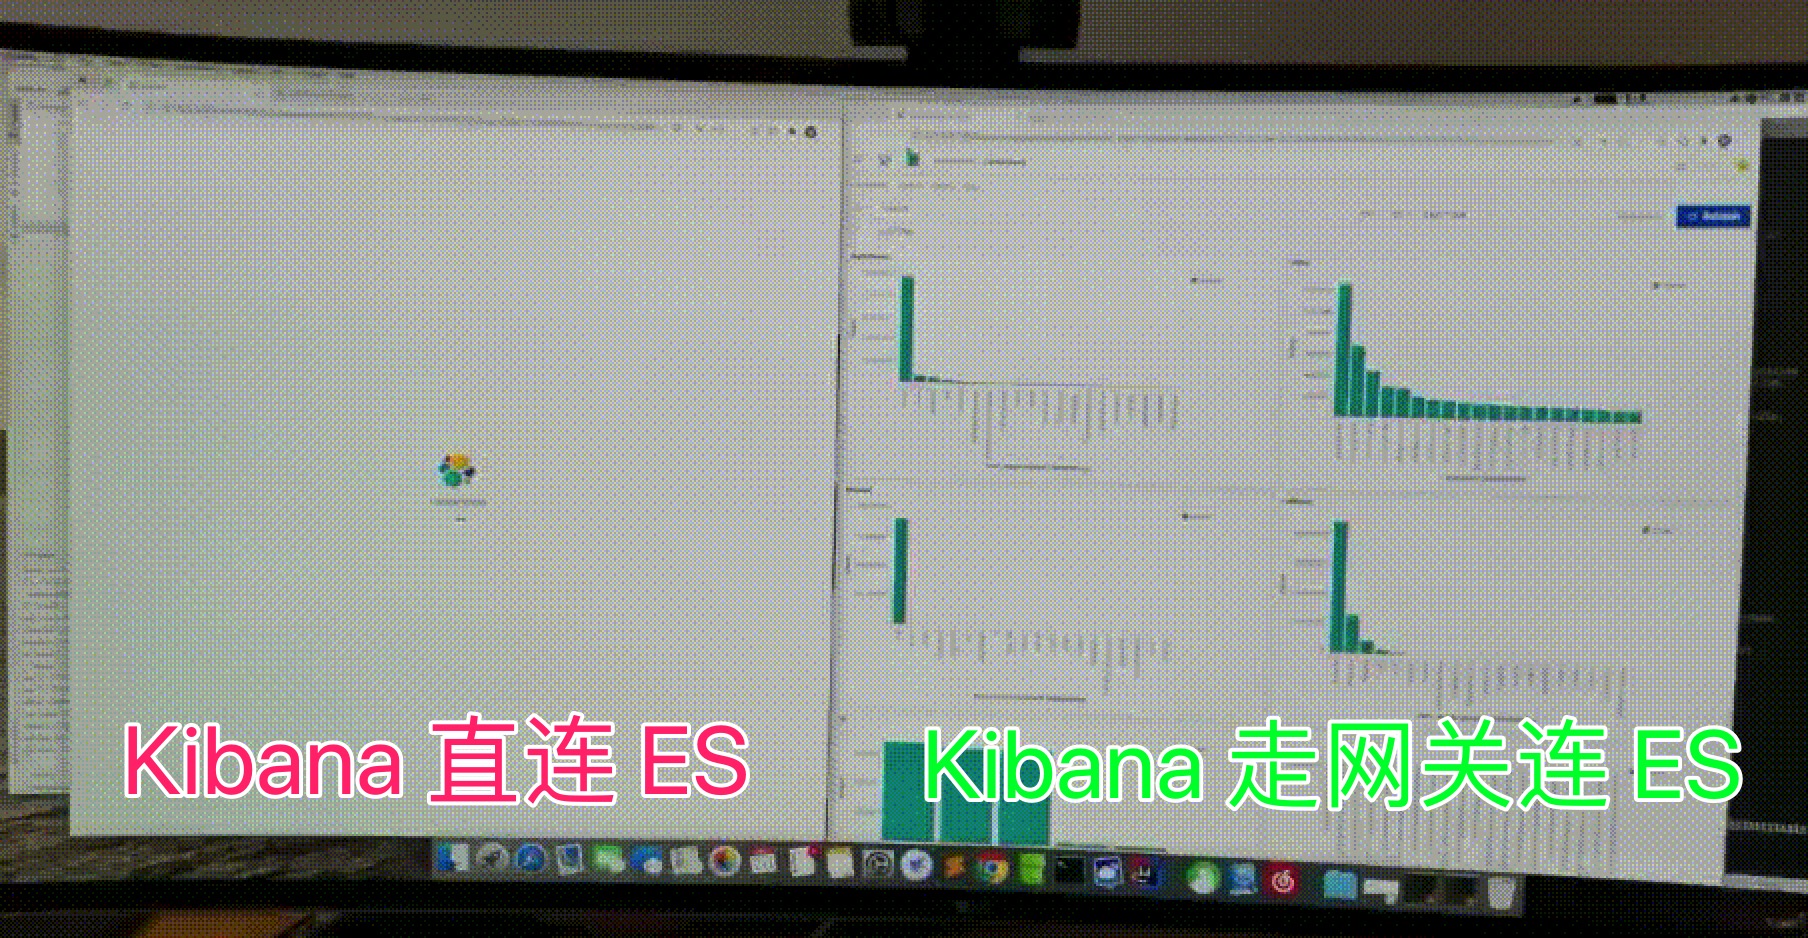
Kibana 走网关可以降低重复请求,缓存常见查询,起到查询加速的效果,如下:
演示视频:https://v.qq.com/x/page/e3209mhh9kj.html
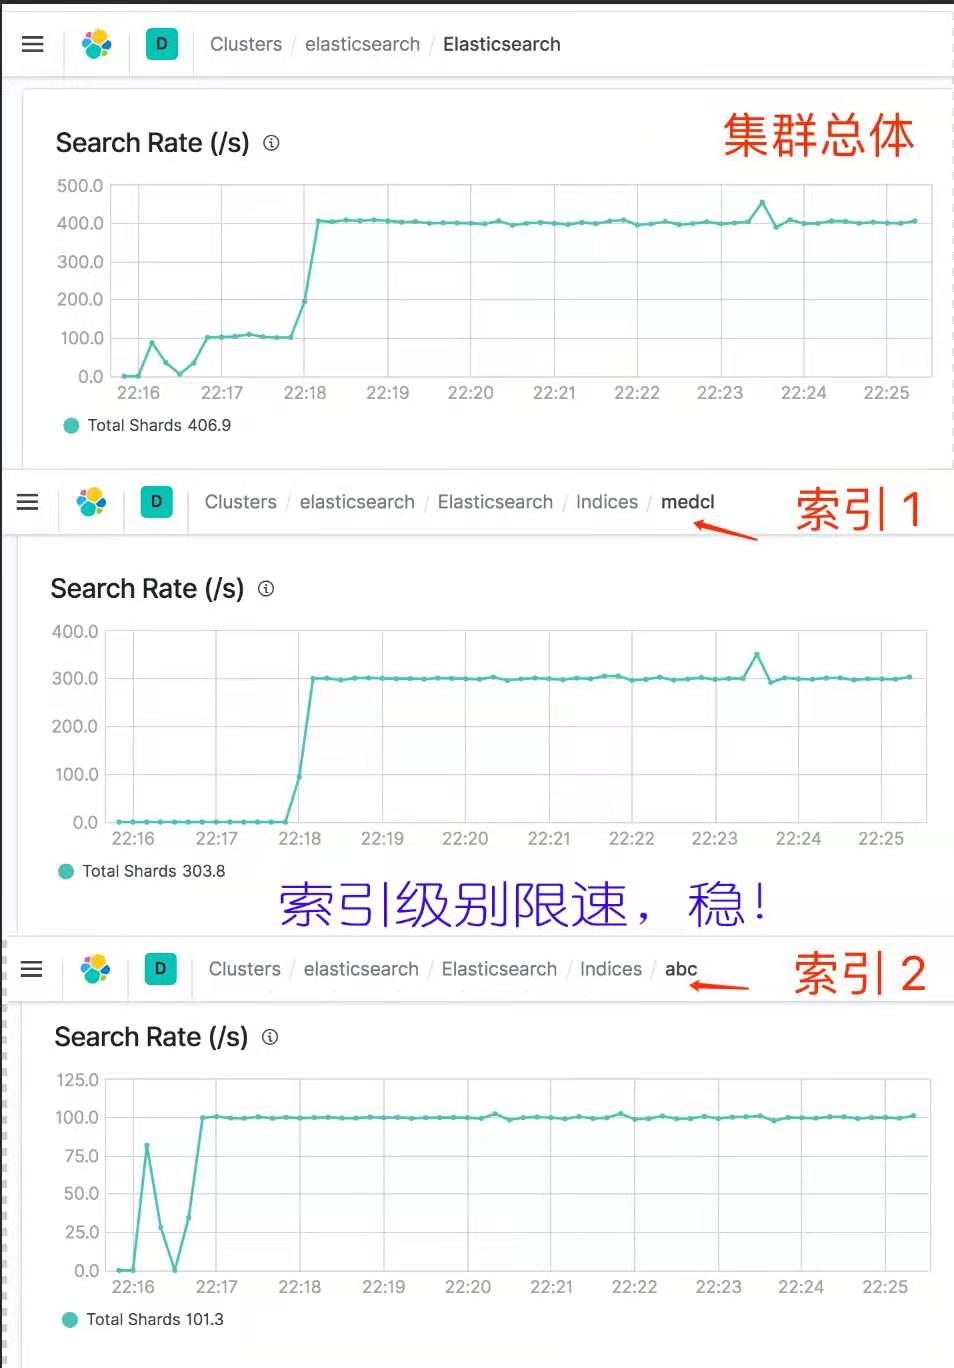
索引级别的限速限流,给后端 ES 稳稳的幸福。
可以开启请求日志,用来分析 ES 查询情况,如下:
追求性能极限,此网关名为极限网关(INFINI Gateway)。
欢迎帮忙测试,提供反馈意见。
每日构建:http://release.elasticsearch.cn/
镜像地址:https://hub.docker.com/r/infinilabs/gateway
文档手册:https://极限网关.com
目前提供的功能:
- 索引级别的请求限速
- 重复请求可以缓存
- Kibana 无缝提速
- Elasticsearch 节点自动发现
- 基于权重的节点选择,权重可配置
- 可控制到每个后端节点的最大连接数
- 查询日志统计分析,用于追踪请求排错审计
性能优异,经过测试,比 Nginx 都更胜一筹。
[root@XXX-ES-01 linux64]# ./esm -s https://elastic:pass@xx.xx.cn:9343 -d https://elastic:pass@xx.xx.cn:8000 -x medcl2 -y medcl23 -r -w 200 --sliced_scroll_size=40 -b 10 -t=30m

[11-12 22:09:38] [INF] [main.go:461,main] start data migration..

Scroll 20377840 / 20387840   99.95% 1m20s

Bulk 20371785 / 20387840   99.92% 1m53s

[11-12 22:11:32] [INF] [main.go:492,main] data migration finished.
使用 ESM 进行集群的一个 2千多万的索引数据进行导入导出,分别走 Nginx 和 Elasticsearch 网关,网关和 Nginx 都部署在同一台16 核 32GB 的机器上,16 核全部跑满,Nginx 可以达到 20w/s,网关可以达到 25w/s。
Kibana 走网关可以降低重复请求,缓存常见查询,起到查询加速的效果,如下:
演示视频:https://v.qq.com/x/page/e3209mhh9kj.html
索引级别的限速限流,给后端 ES 稳稳的幸福。
可以开启请求日志,用来分析 ES 查询情况,如下:
追求性能极限,此网关名为极限网关(INFINI Gateway)。
欢迎帮忙测试,提供反馈意见。 收起阅读 »
社区日报 第1127期 (2020-12-03)
https://mp.weixin.qq.com/s/7pWdS_zPDNiXKzrUOCTVfg
2.Elastic财报上调财年前景
https://news.futunn.com/stock/15709137
3.美图全链路监控实战
https://zhuanlan.zhihu.com/p/313069055
编辑:金桥
归档:https://ela.st/cn-daily-all
订阅:https://ela.st/cn-daily-sub
沙龙:https://ela.st/cn-meetup
https://mp.weixin.qq.com/s/7pWdS_zPDNiXKzrUOCTVfg
2.Elastic财报上调财年前景
https://news.futunn.com/stock/15709137
3.美图全链路监控实战
https://zhuanlan.zhihu.com/p/313069055
编辑:金桥
归档:https://ela.st/cn-daily-all
订阅:https://ela.st/cn-daily-sub
沙龙:https://ela.st/cn-meetup 收起阅读 »
社区日报 第1126期 (2020-12-2)
https://mp.weixin.qq.com/s/_at38HfkKotB8pdp4wgItg
2.使用Grafana监视Kubernetes的最佳实践
https://www.metricfire.com/blo ... fana/
3.Elasticsearch 父子关系
https://mp.weixin.qq.com/s/SyLA7mjrmZoRuUzoq9jrbw
编辑:寂寞的烟
归档:https://ela.st/cn-daily-all
订阅:https://ela.st/cn-daily-sub
沙龙:https://ela.st/cn-meetup
https://mp.weixin.qq.com/s/_at38HfkKotB8pdp4wgItg
2.使用Grafana监视Kubernetes的最佳实践
https://www.metricfire.com/blo ... fana/
3.Elasticsearch 父子关系
https://mp.weixin.qq.com/s/SyLA7mjrmZoRuUzoq9jrbw
编辑:寂寞的烟
归档:https://ela.st/cn-daily-all
订阅:https://ela.st/cn-daily-sub
沙龙:https://ela.st/cn-meetup 收起阅读 »
社区日报 第1123期 (2020-11-29)
https://medium.com/dev-genius/ ... 7ae80
2.(自备梯子)使用Tyk,Elasticsearch和Kibana观察您的API流量。
https://medium.com/%40asoorm/o ... 46c39
3.大多数开发人员工具尚未为M1 Macs准备,但下一代Apple Mx Macs明年将在其推出时成为完全功能强大的主要开发机器。
https://steipete.com/posts/app ... tive/
编辑:至尊宝
归档:https://ela.st/cn-daily-all
订阅:https://ela.st/cn-daily-sub
沙龙:https://ela.st/cn-meetup
收起阅读 »
社区日报 第1125期 (2020-12-1)
https://sysdig.com/blog/monitor-istio/
2.从 Splunk 迁移至ES ,Elastic助力新东方低成本、高效率应对数据增长
https://www.elastic.co/cn/blog ... iency
3.在Docker上使用Kibana和Elasticsearch监视Nginx
https://www.bmc.com/blogs/moni ... cker/
编辑:寂寞的烟
归档:https://ela.st/cn-daily-all
订阅:https://ela.st/cn-daily-sub
沙龙:https://ela.st/cn-meetup
https://sysdig.com/blog/monitor-istio/
2.从 Splunk 迁移至ES ,Elastic助力新东方低成本、高效率应对数据增长
https://www.elastic.co/cn/blog ... iency
3.在Docker上使用Kibana和Elasticsearch监视Nginx
https://www.bmc.com/blogs/moni ... cker/
编辑:寂寞的烟
归档:https://ela.st/cn-daily-all
订阅:https://ela.st/cn-daily-sub
沙龙:https://ela.st/cn-meetup 收起阅读 »
社区日报 第1124期 (2020-11-30)
https://anonymity94.github.io/ ... %2598
2.在K8S上部署elasticsearch
https://staight.github.io/2019 ... arch/
3.ElasticSearch 中使用衰减函数来完美你的搜索结果
http://www.shiguopeng.cn/archives/444
编辑:cyberdak
归档:https://ela.st/cn-daily-all
订阅:https://ela.st/cn-daily-sub
沙龙:https://ela.st/cn-meetup
https://anonymity94.github.io/ ... %2598
2.在K8S上部署elasticsearch
https://staight.github.io/2019 ... arch/
3.ElasticSearch 中使用衰减函数来完美你的搜索结果
http://www.shiguopeng.cn/archives/444
编辑:cyberdak
归档:https://ela.st/cn-daily-all
订阅:https://ela.st/cn-daily-sub
沙龙:https://ela.st/cn-meetup 收起阅读 »

